Ramblings of my work and other shabulous things!

Thursday, November 22, 2012

Holiday Collection!

Christmas is LITERALLY around the corner!  
I just wanted to share some of my newest creations for the holiday!  


Visit My Etsy Shop HERE


Winter Wonderland Holiday Chandelier
Find it HERE


Shimmering White Christmas Car Chandelier
Find it HERE


Antique Gold Leaf Christmas Car Chandelier
Find it HERE


Shimmering Silver Snowflake Christmas Car Chandelier
Find it HERE


Antique Gold Leaf Scroll Christmas Car Chandelier
Find it HERE


Golden Snowflake Christmas Car Chandelier
Find it HERE


Forest Frost Candelabra
Find it HERE

Come visit the shop for even more goodies!

www.shabulouschandeliers.com
www.shabulouschandeliers.etsy.com

Friday, November 2, 2012

My Homemade Mocha Espresso Coffee Creamer


Yep, you heard it right!  Mocha Espresso Coffee Creamer!  And it was created by your's truly!  I just wanted to share this recipe that I made up because 1. It is waaaaay cheaper than store-bought.  2. It tastes waaaay better too.  And 3. You don't get all of that "stuff" in it that you can't pronounce on the label.  I was on a creamer making kick last winter and I have finally settled on the perfect chocolaty dairy creamer for me!  If you are interested take a try at my recipe below!

Warning: it is thick and frothy and 100% addictive.

Shabulous' Homemade Mocha Espresso Coffee Creamer

ingredients:
3 packets generic hot cocoa mix (gives it thickness and flavor)
1/2 qt half and half
3 tsp instant coffee (or 2 via packets from Starbucks)
1/2 teaspoon Vanilla flavor or extract
1 large mason jar with lid (or pitcher)

directions

Combine all ingredients into mason jar or pitcher.
Place lid on and shake vigorously.
Mixture will look clumpy and thick.  That is okay.  Leave it in refrigerator overnight to set.  In the morning pull out container and shake vigorously.  Mixture should be thick and full and foamy inside container.
Pour generously into your cup of coffee. Add to taste.  Swizzle your spoon and you should have an amazing frothy highly caffinated morning treat!  Add a couple of marshmallows for added fun and indulgence!

Should keep at least 2 weeks.

Monday, October 15, 2012

DIY Yard Ghosts

DIY with Shabulous!

My Yard Ghosts!


I know that I've said it before and I will say it again- HALLOWEEN IS MY FAVORITE!  Every year we throw a huge party complete with costume contests, adult games, loud music, and devilish foods and potions! Decorating starts September 1st!  My mantle is my showcase and each year I try to come up with a different set-up (I will share that with you soon).  My yard however is sure to house a very special lawn ornament that I ALWAYS make myself.  Store-bought...shhhhmore-bought!  Not me!  I always try DIY!


So last year it was this scary guy.  I named him Carl.  The adults loved him and the children feared him!  But he was a nice guy, always smiling over your shoulder.  

This year, I've tried two different "yard ghosts".  The first one was inspired by some of the charming little Casper-esque yard ghost decorations in magazines and catalogues.  I took cues from them all to create the perfect giant yard ghost that is as equally friendly as it is sinister (photos and tutorial are below).  

The other type of yard ghost was a much more involved project.  It took me a few days to complete (many breaks and tons of frustration).  I saw a post on Pinterest labeled "Chicken Wire Yard Ghost".  That stopped me dead in my tracks and I thought I ABSOLUTELY MUST HAVE THAT!  I ran a google search for chicken wire ghosts and these were the results I came up with.  


INSPIRATION

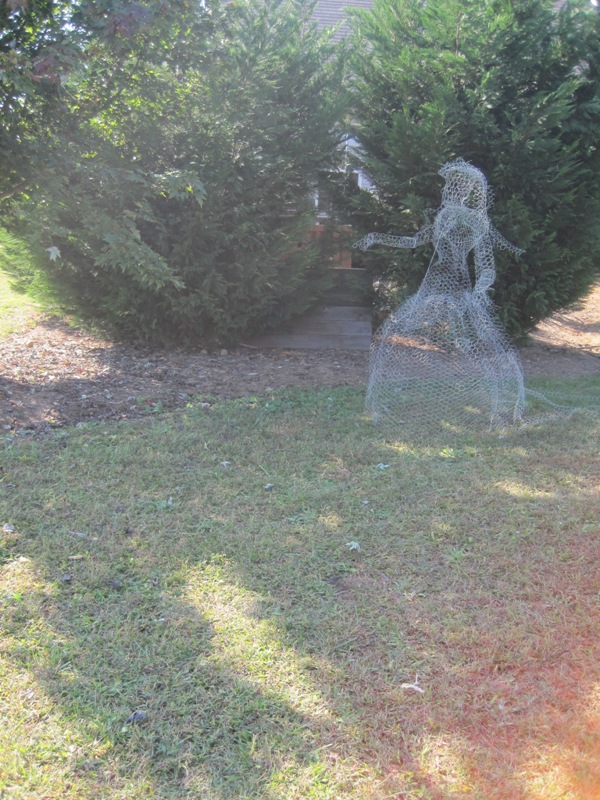
There weren't that many actually.  That is when I decided that I was going to top them all!  I bought my 3ftx18ft of chicken wire, grabbed my lady dress form and plugged away.  The tutorials that I found mentioned that it was easy.....they are so wrong.  It was quite difficult, painful, and tricky.  However, I did stop at nothing to make it as life-like as possible.  Call me an over-achiever.  I even gave it long flowing locks of hair and a dress train to "swish" up off the ground!  All in all, I had a wonderful time building this project.  I will share with you my photos below as well as instructions for yard ghost #1.  I have named him Henry.


MY WANDERING WOMAN


HENRY!


Project difficulty: low to med
Time: 45 min
Cost: approximately $42
You will need:
-1 Happy helper (it's a two man job)
-Step ladder
-1 132" Round White Tablecloth- Find it here
-1 8ft tall rebar rod or wooden dowel (you may have to use a hack saw to cut down to size)- Find it here
-1 7-12" Foam ball- You can either use a floral ball which is here but smaller, or the cheaper version which I used- a kid's foam kickball- Find it here
-1-2 white kitchen bags and twist tie
-med-heavy gage wire
-8 yard stakes
-8 Alligator clips- Find it here
-1 Pair $1 store bought black socks
-Straight pins or hot glue (if you don't mind ruining it as a table cloth)
-Hammer
-Scissors
-Kitchen steak knife (serrated)
-Spotlight stake (optional)- Find it here

Steps:
1. Decide the height at which you want your ghost to hover above the ground.  We did 7ft above ground with 1ft in the ground.  Cut pole to size.
2. With your serrated knife, gently push into center part of bottom side of foam ball.  twist slightly to make a snug hole.  Try to reach the center to ensure stability atop the pole.
3. On a step ladder, use hammer to tap rod down into ground.  If using a wooden dowel you may need to create hole prior to placement.
4.  Place foam ball atop pole.  Make sure it is a snug fit.
5.  Take two white bags and double them up.  Place over top of ball and twist tie below.  This will keep the elements and rain away from the ball so that it does not deteriorate.
6.  Find equidistant points along the outside perimeter of the table cloth.  Use your alligator clips at these points.
7. Using step ladder, toss table cloth over the top of the ball.
8.  Use the wire to thread through the ends or holes of the alligator clips.  Twist wire ends. Then pull to desired length outward from post.
9.  Use hammer to install yard stakes.  Wrap wire ends around these. Do this going from point to corresponding point across- to ensure equal placement.  I chose to have one side of the cloth a little bit higher than the other just to give it some depth and whimsy.
10. Take your socks and separate pair.  With scissors cut 5 inch long narrow tear drop shape (will make two because of tube-shaped sock).  Take the other sock and cut 1 long narrow tear drop shape approximately 7" long or length of the sock.  The longer mouth the creepier.
11. Use your straight pins or hot glue to affix the eyes and mouth.  I used the pins so that I can use the table cloth in the future.  Since it is white, I can just throw it in the wash with added bleach.  Also, the great thing with working with socks is that the shape will not be perfect.  In fact, the edges may be slightly frayed and you can actually pull on the fabric because of the elasticity.  You can shape it into as eerie a mouth as you want!
12.  Place your spotlight stake underneath center and route to power.
13.  Stand back and admire your larger than life awesome yard ghost!


HaPpY HaLLoWeEn!!!

Come visit my Etsy shop to see my chic custom lighting HERE!

You can also follow me on facebook HERE!

If you are interested in a tutorial of the "chicken wire ghost", you're going to have to speak up!  Share this post with your friends and family and let me hear from you!  Thanks for your support!

Monday, September 17, 2012

SHABULOUS HALLOWS EVE EDITION

Fall is upon us.  And no better way to bring in the new season but with the eerie glow of firelight!  YES!  Halloween is coming and my new collection is all about Hallows Eve!  Halloween is BY FAR my favorite Holiday!  To me it is much more than a day, it is an entire season!  In my home, every day starting with September 1st through November 1st is Halloween.  That is when my pumpkins become lit, black cats come out to play, and my yard ghosts blow in the wind.  Neighbors must think that I am crazy.  It is early, I know, and I DON'T CARE!  It makes me happy and that is what I plan to do. Halloween starts early in this house.  I even turn down the A/C just to give more of a chill in the air!  My bad-attitude summer blues begin to fade and I look forward to those cool nights sipping cider underneath a big full moon to the crackling sound of my fire pit.  Oh yes, it is coming.  And for Shabulous Chandeliers...it is already here.  Muuaahhhahhhaahhhh...

Come check out my spooky new Hallows Eve creations in my shop!

Find HERE

Find HERE

Find HERE

Find HERE

Find HERE

HaPpY HaLlOwEeN!!!


Wednesday, August 8, 2012

World's Worst Rice Crispy Treat Maker


Fans and friends,

Normally, I do not share any kind of food or recipe type interests on my blog.  I leave that to the experts.  However, today I was so inspired by my "screw up" that I had to share!  So, I came across this delicious sounding recipe for Smore's Graham Krispy Treats. BUT my son is allergic to chocolate (so sad)... So the wheels started turning.  I wanted to make an equally yummy treat while substituting the chocolate.  Instead of using graham cereal I used a wheat bran Chex.  And instead of chocolate we used butterscotch morsels.

My little man and I got out all of the necessary ingredients and materials and set out to make the best batch of mallow treats anyone has ever tasted!  You see, here's where Ethan went wrong... He made them with ME! And I RUIN rice crspy treats!  I thought that this batch would go differently with the different/substituted ingredients.  Nope.  I followed the recipe point to point and they just became one big fat gooey mess that burnt the bottom of my pan.

After a brief (and silent) hissy-fit I surveyed my options.  A little pouting may have shown and I may have muttered "I'm a horrible mom for not being able to get rice crispy treats right- the easiest thing in the book. Literally, THE EASIEST!"  But he re-assured me that I was absolutely wrong and that they are actually quite delicious especially the crispy burnt part.  He said this as he was picking at the big monstrous mass of goo in the mixing bowl.  I then let go of my self-pitty and grabbed the bowl by the horns. . .  I mean rim!  Scooping up handfuls of the mixture I rolled and patted them into perfect personal patties.  Now that they are cooled and set they are seriously tasty little pucks!  Considering my years-long battle with the mallow treats and for the first time, not throwing away the results, our Wheat Bran Scotch Pucks turned out to be an absolutely delicious hit!

I have posted the recipe below in case you want to try and ruin yours!  Good luck messing it up!

Wheat Bran Scotch Pucks
ingredients:


1 bag (10 oz) Mini Marshmallows
1 bag butterscotch chips
1 box (12 0z) Wheat Chex Cereal
6 Tbsp Butter
1/2 teaspoon Vanilla
Non-Stick Cooking Spray

directions:

On a flat baking pan, spray with non-stick cooking spray. Set aside.
In a large non-stick pot over medium heat, melt butter. Add in marshmallows and stir together with butter until marshmallows have melted and become creamy (I never get this part right), Stir in vanilla extract.
Fold in Chex cereal until all marshmallows and Chex are evenly mixed together. Mix in bag of butterscotch chips. Let mixture cool a slightly to the touch.  With clean bare hands (or with latex gloves) grab a handful of mix in hands, roll and pat into a patty. Place onto greased flat pan pressing slightly to flatten. Continue until entire mixture is gone. Place into fridge for 10 minutes to cool.
Arrange your pucks on a decorative plate and set out for snacks.  You'll be thrilled that something so wrong turned out so right! Devour.