Ramblings of my work and other shabulous things!

Monday, August 26, 2013

Vintage Inspired Alice In Wonderland Wedding


It was a mild and sunny spring day on lovely rustic property fit for elation and merriment! Shabulous Chandeliers/Creations was invited by event designer, Elisa Restea, (http://www.elisarestea.com) to participate in a fun and whimsical photo shoot spotlighting several extremely talented vendors from various tricks and trades.  The theme was "A Mad Hatter's Wedding".  The event was blissfully enchanting!  Scroll down to get a glimpse of the magic found. . . 
down the rabbit hole.  

You can view the entire published article on ruffledblog.com (http://ruffledblog.com/alice-in-wonderland-wedding-inspiration/).


Above: Tall golden scroll candelabra in crystal and emerald drops.
See my candelabras HERE


Above: Camelot elegance medieval inspired candelabras in crystal clear and ruby drops.
See my candelabras HERE


Above: Tall yet petite golden scroll cake stand with crystal clear and ruby drops.
See my chandelier cake stands HERE


Above: Royalty's round cake stand in 14" golden pedestal with crystal clear, ruby, and emerald drops.
See my chandelier cake stands HERE


If you are inspired to see more of my candelabras, cake stands, and lighting options, please visit my online boutique at 

You can visit my official website at

You may contact the individual vendors that participated in the photo shoot in the detailed list below.

Thanks goes to Elisa Restea for the much appreciated opportunity and day of fun.  Thanks also goes to my fellow artists and designers that helped contribute to the success of the day!  Great job to everyone and it was a pleasure working with you all.

Shoot Location: Serenbe, GA
Photographer: Simply Sarah Photography
Dresses: Claire LaFaye
Design/Styling: Elisa Event Design
Candelabras and Cake Stands: Shabulous Chandeliers
Florals: Elisa Event Design
Paperie: Ink Lemonade 
Furnitures: Vanity + Couch: Rhapsody Attic / Farm Table: Goodwin Rentals
Desserts: Blue Eyed Daisy
Models: Max Owen, Kirstie Allen, Kayla Foster, Caroline Frese, Nathalie Joy Nicoara
Hair + Makeup: Nathalie Joy Nicoara


Wednesday, April 3, 2013

As Seen On HGTV!


Welcome to Shabulous Creations' Blog!

You may have been re-directed here from the HGTV website via the "Dear Genevieve" show.

You may visit the official Shabulous Chandeliers website and shop by following the links below.


You may also email me at: contactus@shabulouschandeliers.com

Saturday, March 9, 2013

Princess For A Day...

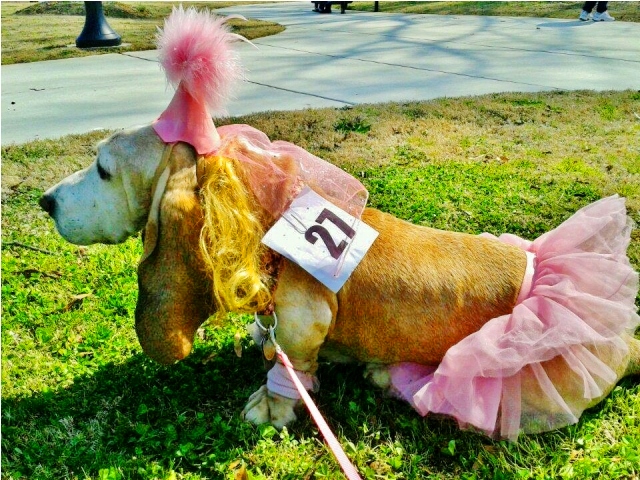
Today, Shabulous Chandeliers was proud to sponsor one of the contestants in the 3rd Annual Locust Grove Mardi Growl parade and Dog Show- Nessie.  I just had to share our experience!  


This is Nessie.


She is a full-bred bassett hound around 7 years old.  I must give you a little background info on this beautiful beast.  The day we were moving in to our new home 2 years ago through pouring rain we opened the back door to see a head pop up out of the pre-existing kid's playhouse.  When did we get a basset hound?  Where did it come from and how is this possible?  The fence gate was locked and there were no holes in or out.  So, the suckers that we are, are now the proud owners of the ugliest dog you will ever see in.  There are several theories on her place of origin but we are still baffled.  My favorite is that she is an alien from the faraway planet Derp.  (hence her knickname, Derp).  Or she may be an ill-evolved monster from Lake Lock Ness (hence her actual name, Nessie). 

She may be the most mentally challenged dog in the state of Georgia.  Nevertheless, she is sweet, and silly, and full of personality!  I hope you enjoy our picture story of her big day!  As you can see she earned her title appropriately.  She won!


Working it

Best Personality goes to: The Lock Ness Monster- NESSIE!!!

Contestant: #27
Nessie Nelson(AKA Derp)
Talents: Destruction of all things fuzzy, digging holes, eating dirt, running into walls, slobbering, and tripping humans.
Hobbies: Eating 16" frozen pizzas whole (box and all), consuming 3lbs of pretzels in one sitting, filling the garage with 2lbs of flour out of boredom, lapping up spilt peroxide, flinging boxes of plastic cutlery in a 20 foot radius for fun.


Waiting her turn for the judges


Taking a break from the paprazzi
Her first price for people's choice!
Rooting through her goodies for Best Personality!
Nessie in all her glory

She had a lot of fun and met lots of friends.  She is now pooped.  Poor ugly little Nessie was a pricess for a day...


Sunday, February 10, 2013

Shabulous Spring Wedding Collection!

In the past few years I have come to understand that this is "wedding season".  My orders flood with excited brides-to-be with color choices to match their wedding party and a custom made shabulous chandelier or candelabra to add the perfect touch of light to their very special day.  This year I am prepared and have several new pieces for your ceremony or reception.  I am sharing those here today!  Not all of them have been listed on Etsy yet, but stay tuned...they will be up soon!

Shabulous Spring Wedding Collection 2013


Wednesday, January 30, 2013

Shabulous How To: DIY Firepot!


I have been enamored with these new trendy fire pots!  Sometimes they are called fire bowls.  They are so pretty AND practical when it comes to outdoor dining and entertaining.  I took cues from brands like the following and set out to make my own version without the hefty price tag.


So, here is my interpretation with the same function but a bit more pizzazz! If you have any questions on how to create just shoot me an email!  Good luck and have fun making your own trend-setting fire pot!

Shabulous DIY Fire Pot

Things you will need:
1 medium to large tiki torch
1 decorative pot or urn to fit
Fill dirt or sand
Decorative stones or pebbles
Small trowel


Step 1: Dis-assemble your tiki torch and pull the canister right out of the bamboo casing.  
Step 2: Fill your decorative pot with fill dirt or sand to a level that will hold your tiki canister level with the rim.
Step 3: Use one hand to hold the canister center and the other to fill the sides of the pot with your filling.  Press to compact as needed.
Step 4: Fill to a height just at the top of the canister leaving about a quarter of an inch at the top (where you will be placing your stones).
Step 5: Dust off any extra soil off the top to give it a finished look.
Step 6:  Place your stones in an attractive fashion along the top of the pot rim.
Step 7: Place in a safe spot and light for all of your company to see!